
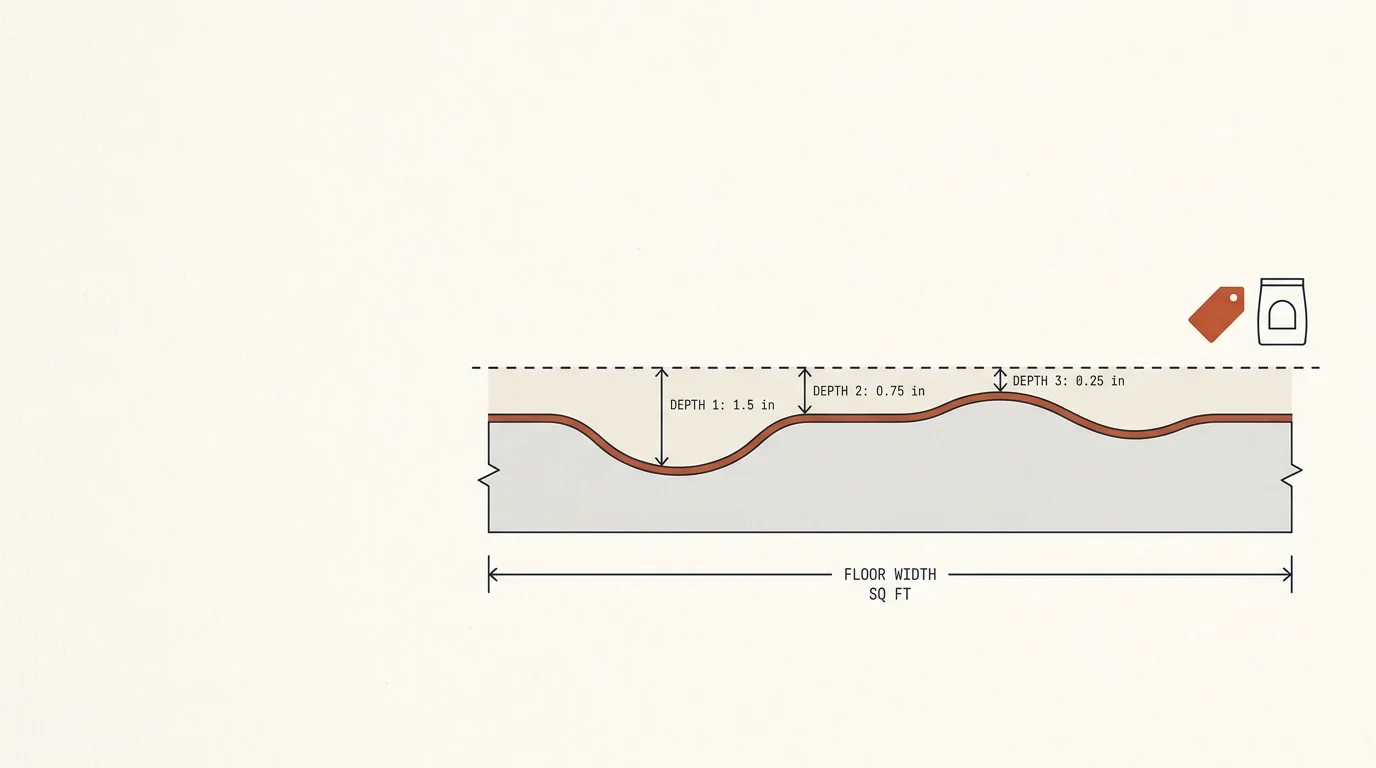
A self leveling concrete calculator tells you exactly how many bags or pounds of self-levelling compound you need to flatten an uneven subfloor before installing tile, hardwood, LVP, or any other flooring that demands a smooth surface. Buying too little means a second trip and a visible seam between pours. Buying too much wastes money on an expensive specialty product. Our self leveling concrete calculator factors in your floor area, the depth of the low spots, and the product’s coverage rate to produce a precise material quantity.
Enter your floor details below for an instant calculation. Then read the full guide for product selection, subfloor prep requirements, pour techniques, and the per-bag costs that complete your budget.
Calculation method, sources and important limitations
Floor area equals length × width × number of sections, minus deductions. Volume equals area × average thickness. Bag quantity is based on the chosen manufacturer coverage at 1/8 inch, scaled in direct proportion to thickness and bag weight, multiplied by the waste allowance, and rounded up to a whole bag. Material cost includes whole bags and optional whole primer units. Labor and preparation are optional planning allowances.
ARDEX V 1300 lists approximately 58 sq. ft. per 50‑lb bag at 1/8 inch and 29 sq. ft. at 1/4 inch. ARDEX K 10 lists 50 sq. ft. at 1/8 inch and 25 sq. ft. at 1/4 inch. ARDEX LU 100 lists 44 sq. ft. at 1/8 inch and 22 sq. ft. at 1/4 inch. Coverage varies with surface profile, density and porosity; the product data sheet controls.
“Self-leveling concrete” sold for floors is generally a cementitious underlayment or topping, not structural concrete. Verify substrate compatibility, minimum and maximum thickness, primer, lath or reinforcement, moisture limits, movement joints, aggregate extension, temperature, working time and finished-floor compatibility. Deep fills may require approved aggregate or multiple lifts. Check floor load capacity before placing thick material, especially over wood framing. Do not use this calculator to design a structural slab.
How a Self Leveling Concrete Calculator Works
Every self leveling concrete calculator starts with your floor area in square feet and the average thickness you need to pour. Then, it converts that volume into cubic feet and applies the coverage rate for your chosen product (typically listed as square feet per bag at a specific thickness). Finally, it rounds up to whole bags and adds 10% for waste and low-spot variation.
Specifically, the formula is: Floor Area (sq ft) × Average Thickness (inches) ÷ 12 = Cubic Feet of Material Needed. Then divide by the product’s cubic feet per bag to determine bag count. However, subfloor irregularity means the actual pour thickness varies across the floor — the average thickness is the key input the self leveling concrete calculator uses.
Average Self Leveling Concrete Cost in 2026
Self-levelling compound costs $1.50 to $5.00 per square foot for material at typical application thicknesses. Here are the primary product categories and costs.
- Standard self-levelling underlayment: $25 – $45 per 50-lb bag. Covers 25 to 50 sq ft at ⅛-inch thickness per bag. Suitable for levelling depressions and smoothing subfloor imperfections before flooring installation.
- High-flow self-levelling compound: $35 – $60 per 50-lb bag. Greater flow distance and thinner minimum application. Ideal for large open areas where the compound must travel far from the pour point.
- Featheredge/skim coat compound: $15 – $30 per bag. For very thin applications (paper-thin to ⅛ inch). Used to smooth minor imperfections rather than fill significant low areas.
- Gypsum-based self-leveller: $20 – $40 per bag. Lighter weight and suitable for wood-frame construction where concrete weight is a concern. However, not suitable for wet areas.
For a 200-square-foot room requiring an average ¼-inch thickness, expect to use 8 to 12 bags at a material cost of $200 to $540. Furthermore, primer (required before pouring) adds $30 to $60 per gallon, covering approximately 200 to 400 square feet per gallon.
Self Leveling Concrete Calculator: Coverage Rate Guide
Understanding coverage rates helps you verify the self leveling concrete calculator results. Here are typical rates for standard 50-pound bags.
- At ⅛-inch thickness: 40 – 50 sq ft per bag.
- At ¼-inch thickness: 20 – 25 sq ft per bag.
- At ½-inch thickness: 10 – 13 sq ft per bag.
- At 1-inch thickness: 5 – 6 sq ft per bag.
Consequently, thickness dramatically affects material quantity and cost. A room needing ½ inch of levelling requires four times as many bags as the same room at ⅛ inch. Therefore, accurately measuring the depth of your low spots is critical. Use a long straightedge (6 to 8 feet) and a tape measure to identify the deepest depressions and calculate the average depth across the floor.
When to Use Self-Levelling Concrete
Self-levelling compound is the right solution for specific subfloor problems. Here is when to use it — and when a different approach is better.
Use Self-Levelling Compound When
First, the subfloor has broad, shallow depressions. Low spots over 2 to 4 square feet that prevent flooring from lying flat are the classic application. Self-levelling compound fills these areas and creates a smooth, flat surface by flowing to its own level.
Second, you are transitioning between subfloor heights. When adjacent rooms have different subfloor elevations (common where additions meet original construction), self-leveller creates a gradual ramp between heights.
Third, you are installing tile, LVP, or hardwood over concrete. Concrete slabs often have ridges, trowel marks, and subtle dips that telegraph through thin flooring. A thin levelling pour creates the flat surface these materials require. Our concrete slab cost calculator covers the slab construction costs where levelling is often a finishing step.
Do Not Use Self-Levelling Compound When
First, the subfloor has structural issues. Self-leveller fills low spots — it does not fix bouncy, sagging, or structurally deficient subfloors. If the floor deflects when walked on, the joists or sheathing need repair before levelling.
Second, you need more than 1.5 inches of fill. Most self-levelling products have a maximum single-pour thickness of 1 to 1.5 inches. Deeper fills require multiple pours with curing time between each, or a different approach such as a poured concrete topping or a plywood built-up system.
Subfloor Preparation for Self-Levelling Concrete
Proper prep is essential — self-levelling compound bonds only to clean, primed surfaces and flows uncontrollably through unsealed gaps.
Cleaning
Remove all dust, debris, adhesive residue, paint, curing compounds, and any loose material from the subfloor. Specifically, concrete surfaces should be mechanically cleaned (scraping, grinding, or shot-blasting) to expose fresh material. Sweeping alone is insufficient — a vacuum after scraping ensures dust-free conditions.
Priming
Apply the manufacturer’s recommended primer to the clean subfloor and allow it to dry before pouring (typically 2 to 4 hours). The primer serves two critical functions: it controls absorption (preventing the subfloor from sucking moisture from the compound too quickly) and it creates a bonding surface. Skipping primer causes delamination — the leveller separates from the subfloor as a loose, cracked layer.
Damming
Self-levelling compound is a liquid — it flows through every gap, crack, and opening it finds. Seal all floor penetrations (pipe holes, register openings), doorway thresholds, and subfloor seams with foam backer rod, caulk, or duct tape before pouring. Furthermore, dam doorways where you do not want the compound to flow into adjacent rooms. Our interior painting cost calculator covers the wall-finishing work that pairs with floor levelling in renovation projects.
Self Leveling Concrete Calculator: Pouring Technique
Self-levelling compound sets quickly — typically 10 to 20 minutes of working time. Here is the step-by-step process.
First, mix the compound according to the manufacturer’s water ratio using a drill-mounted mixing paddle. Undermixing leaves lumps; overmixing introduces air bubbles. The consistency should be similar to thick pancake batter — fluid enough to flow on its own but not watery.
Second, pour immediately after mixing. Start at the farthest point from the exit and pour in a steady stream across the floor. The compound flows and self-levels as the name suggests, but spreading with a gauge rake ensures even distribution, especially in larger areas.
Third, use a spiked roller immediately after pouring. Rolling the surface with a spiked roller (also called a porcupine roller) releases trapped air bubbles that would create pinholes in the cured surface. Roll in parallel passes across the entire poured area.
Fourth, allow curing time before installing flooring. Walking is typically safe after 4 to 6 hours. Flooring installation begins after 16 to 24 hours for most products. However, moisture-sensitive flooring (hardwood) may require 3 to 7 days of drying for thicker pours. Specifically, always test moisture levels with a meter before installing flooring over self-levelling compound.
Self Leveling Concrete Calculator: DIY vs. Professional
Self-levelling is one of the more challenging DIY flooring tasks due to the time pressure and precision required.
DIY cost for a 200-square-foot room:
- Self-levelling compound (8–12 bags): $200 – $540
- Primer: $30 – $60
- Mixing drill and paddle: $50 – $100 (rental or purchase)
- Gauge rake and spiked roller: $40 – $80
- Damming supplies: $10 – $30
Total DIY: $330 to $810. In contrast, professional installation costs $3 to $6 per square foot for labour alone, adding $600 to $1,200 for the same room. Consequently, DIY saves 40% to 60%.
However, self-levelling compound is unforgiving — once mixed, it must be placed within minutes, and mistakes cannot be reworked after it sets. For rooms under 100 square feet, DIY is very manageable. For larger rooms requiring multiple bags mixed in rapid succession, a helper (or two) is essential. Professional installation makes sense for rooms over 300 square feet, multi-room projects, and floors requiring precise flatness tolerances. Our home addition cost calculator covers floor levelling as a component of room addition and renovation projects.
Frequently Asked Questions
How much self-levelling compound do I need?
The amount depends on floor area and pour thickness. At ¼-inch thickness, a standard 50-lb bag covers approximately 20 to 25 square feet. A 200-square-foot room at ¼ inch needs 8 to 12 bags. Use the self leveling concrete calculator above for a precise quantity based on your measurements.
How thick can you pour self-levelling concrete?
Most products allow a single-pour thickness of ⅛ inch to 1.5 inches. Thicker applications require multiple pours with curing time between each. Specifically, check the product data sheet — maximum thickness varies by manufacturer.
Can self-levelling compound be used on wood subfloors?
Yes, but wood subfloors require additional preparation. The wood must be structurally sound and rigid (no bounce), and a bonding primer formulated for wood substrates must be applied. Furthermore, sealing all plywood seams with tape prevents the compound from seeping through joints.
How long does self-levelling concrete take to dry?
Walking is safe after 4 to 6 hours. Flooring installation over thin pours (under ¼ inch) can begin in 16 to 24 hours. Thicker pours (½ inch to 1 inch) may require 24 to 72 hours. Moisture-sensitive flooring like hardwood requires moisture testing regardless of cure time.
The Bottom Line on Self-Levelling Concrete
Self-levelling compound is the fastest, most reliable way to create a flat subfloor for any flooring installation. Use our self leveling concrete calculator at the top of this page to determine exactly how much product you need, then follow the preparation and pouring guidelines above for a smooth, professional result.
All figures in this guide are 2026 estimates. Your actual cost will vary with product brand, pour thickness, and subfloor condition. Always follow the manufacturer’s instructions for mixing, priming, and curing.